So you've decided you want a pool. The kids are begging for it, summer is coming, and the backyard is sitting there doing nothing. But before you commit to anything, you want to understand exactly what the installation process looks like: what happens, how long it takes, and who needs to be involved.
Good thinking. A fibreglass pool is a significant investment, and the more you understand the process upfront, the smoother the experience will be.
This guide walks you through every stage of fibreglass pool installation in New Zealand, from your first conversation with an installer through to your first swim.
Before we get into the installation steps, it helps to understand why fibreglass has become the go-to option for New Zealand homeowners.
Compared to concrete, fibreglass pools install faster, cost less over time, and require far less maintenance. The smooth gelcoat surface resists algae growth, meaning fewer chemicals and less scrubbing. Compared to above-ground pools, they look better, last longer, and add genuine value to your property.
For families in Wellington and Wairarapa especially, where outdoor living season can be shorter, a low-maintenance pool that's quick to get up and running just makes sense.
The Full Fibreglass Pool Installation Process
Every pool project starts with a conversation. A reputable installer will visit your property to assess:
This is also when you'll discuss pool models, sizes, and colours. At NZ Pools, we stock the Leisure Pools Australia range, which includes models like the Reflection, Elegance, Absolute, and Acclaim in sizes and colours suited to New Zealand backyards.
The consultation is your chance to ask every question you have, there are no dumb questions.
Once the site assessment is done, your installer will put together a detailed quote covering the pool supply, excavation, installation, plumbing, electrical, and any additional work like fencing, decking, or landscaping.
In New Zealand, inground swimming pools typically require a building consent from your local council. Your pool installer should guide you through this process, or handle it on your behalf. In Wellington and Wairarapa, this means working with Wellington City Council, Porirua City Council, Upper Hutt City Council, Lower Hutt City Council, or Masterton District Council depending on your location.
Timeframes for consent approval vary, but your installer should build this into the project timeline from the start. Rushing consent is a red flag.
What to look for: A good installer won't start digging until consent is approved. Anyone who suggests you can deal with consent "later" is not someone you want managing your project.
Once consent is granted and a start date is confirmed, excavation begins. This is when the project becomes real.
A digger is brought in to excavate the pool shell cavity to the correct depth and shape. The hole is dug slightly larger than the pool shell to allow for backfill and to make positioning easier.
Excavation typically takes one to two days for a standard residential pool, depending on soil conditions and site access. Rocky ground, clay soils, or tight access points can extend this phase.
The excavated soil is removed from site. Your yard will look like a construction site at this stage, which is completely normal.
The fibreglass shell is manufactured off-site and delivered to your property on a truck. Depending on your section's access, it will either be lifted into position using a crane or manoeuvred into place via the delivery vehicle.
This is one of the most dramatic moments of the project. Watching a large pool shell being lowered into the ground is something homeowners remember. It also tends to attract interested neighbours.
The shell is positioned carefully in the excavated cavity and levelled to ensure even water distribution once filled.
With the shell in the ground, we connect the pipework for the filtration system, including the skimmer box, main drain, return jets, and any additional features like water features, lights, or heating connections.
As plumbing progresses, the cavity around the shell is backfilled with a sand and gravel mix (or in some cases, concrete) to secure the shell in position and prevent movement. This process happens in stages, with the pool being partially filled with water simultaneously to balance the pressure inside and outside the shell.
Getting this stage right is critical. Poor backfilling leads to cracking or shell movement over time. This is not the stage to cut corners.
The pool equipment (pump, filter, salt chlorinator or chemical dosing system, and any automation) is installed in a designated equipment area, usually beside the pool or in a concealed cabinet..
If you've opted for LED lighting, heating (heat pump or solar), or a smart automation system, these are all connected and tested during this phase.
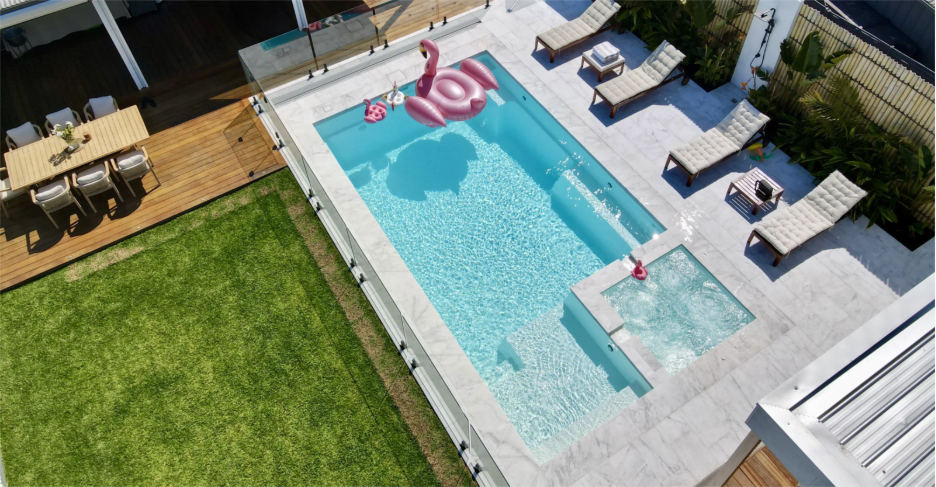
The bond beam (concrete skirt) around the pool is formed and poured. This creates a finished edge between the pool shell and whatever surrounding surface you've chosen: concrete, pavers, timber decking, or artificial grass. Your copings will be laid onto the top of the bond beam and then the rest of your hard landscaping will be laid after that.
This phase also includes any steps, built-in seating, or feature walls you've agreed on in the design stage. The pool surround makes a significant difference to the final look of your outdoor area, so it's worth putting thought into the finish early.
In New Zealand, inground pools must be enclosed by a compliant safety fence under the Fencing of Swimming Pools Act 1987 (now incorporated into the Building Act). The fence must meet specific height and gate requirements, and your local council will inspect it as part of the consent sign-off.
Pool installers may co-ordinate the fencing contractor, but confirm this during the quoting stage. Pool fencing is not optional, and non-compliance is a legal liability.
At the end of the project, the pool fencing is inspected by your local council as part of the building consent close-out process. Once the inspector is satisfied, the code of compliance certificate is issued.
Your installer will also do a full handover with you, covering:
A quality installer doesn't disappear after handover. Look for someone who offers ongoing support and is happy to answer questions months after installation.
The pool is filled (usually with a hose, and it can take 24 to 48 hours), water chemistry is balanced, and the filtration system is commissioned.
Once everything checks out, it's time to swim.
For a new fibreglass pool, the first few weeks involve more frequent testing as the water chemistry stabilises. Your installer should walk you through this, or recommend a local pool shop that can test and advise.
From signed contract to first swim, a typical fibreglass pool installation takes 6 to 12 weeks, depending on:
The physical installation (from excavation to handover) typically takes 2 to 4 weeks once consent is granted and materials are on hand.
Not all installers are equal. Here's what separates good from great:
Transparency about costs. Your quote should be detailed and fixed-price where possible. "We'll sort that out later" is not acceptable on a project of this size.
Experience with local councils. Wellington and Wairarapa councils each have their own quirks and timelines. A local installer who has done this hundreds of times will navigate consent faster and with fewer surprises.
Industry recognition. SPASA (Swimming Pool and Spa Association) awards are the industry benchmark. NZ Pools is a SPASA Gold Award winner for 2024 and 2025, an independent assessment of installation quality that you can trust.
Aftercare. The relationship doesn't end at handover. Ask installers how they handle issues that come up post-installation. Read their Google reviews specifically for post-installation support.
References. Ask to speak with past customers in your region. Any confident installer will be happy to provide them.
Do I need council consent for a pool in Wellington?
Yes. Inground pools require building consent in Wellington and across Wairarapa. Your installer should manage this process for you.
How deep can a fibreglass pool be installed on a sloped section?
Most sections in Wellington are not flat. Experienced installers work with sloped sites regularly and can use retaining walls, raised surrounds, or split-level designs to make a pool work on your section.
Will a pool add value to my property in Wellington?
Generally yes, particularly in family-oriented suburbs. A well-installed pool with quality fencing and landscaping is considered a genuine value-add.
What's the difference between fibreglass and concrete pools?
Fibreglass pools install faster, cost less to maintain, and the shell doesn't require resurfacing. Concrete pools offer more flexibility in shape but take longer to build, cost more upfront, and require regular acid washing and resurfacing over their lifespan.
If you're thinking about a fibreglass pool in Wellington or Wairarapa, the best first step is a no-obligation site visit and quote. You'll get a realistic picture of what's possible on your section, what it will cost, and what the timeline looks like.
NZ Pools handles the full process, from design and council consent through to installation, and handover. Our team has installed pools across Wellington and Wairarapa for years, and we're proud of our reputation for transparent communication and ongoing support.
Request a Quote Or browse our pool range to find the model and size that suits your backyard: View Pool Range